
Download Using_Mango.pdf
Regions of Interest
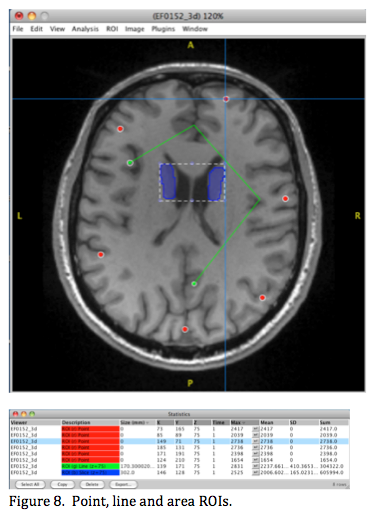 Mango supports point, line, single-slice (2-D) and multi-slice (3-D) ROIs. A point ROI is indicated in the viewer as a small colored circle (Fig 8, red). When selected for analysis a white ring appears around the circle. A line ROI is defined as a single or multiple line segments of the same color (Fig 8, green). When selected a white ring appears around its end points. A 2-D ROI can be displayed as an outline (edge), filled (mask) or both (Fig 8, blue). When both options are selected the mask transparency defaults to 50%.
To calculate summary stats for an ROI highlight it and select the viewer's menu option Analysis/ROI Statistics. Summary statistics are posted in the 'Statistics' window (Figure 8 bottom). ROI Stats can be calculated for the current slice, all slices, or over the ROIs entire volume (slice range). The large crosshair can be positioned within an ROI by clicking the back-arrow button in its row (Fig 8 bottom). In this example the large crosshair is positioned at the 3rd point ROI.
The statistics table has several options for the size and value headings. In Figure 8 size is in physical units (mm), but it can be toggled to be number of voxels. For point ROIs size is zero (as it should be), length for a line ROI, and volume for 2-D or 3-D ROIs. Even a 2-D or single-slice ROI has units of volume since it has both area and slice thickness. If the area of a 2-D ROI is desired the user can divide the reported volume by the slice spacing. There are several voxel value options, and in Figure 8 it was set to be the maximum value. Other options are minimum value and the value at the ROIs centroid (weighted center of mass). Note: An ROIs centroid may not fall within the ROI, and in Figure 8 it is outside both the line and 2-D ROIs. Also note that the blue ROI in Figure 8 was treated as a single ROI though it consisted of two non-connected components, one in the left hemisphere and one in the right.
ROI - Multi-slice
A multi-slice ROI of the same color is a 3-D ROI, which is also called a volume of interest or VOI. Figure 9 illustrates the multi-slice nature of Mango's 3-D ROIs in the orthogonal slice viewer. The surface viewer (Figure 9, lower right) highlights the 3-D nature of the surface of the lateral ventricle formed about its 3-D ROI. A 3-D ROI need not be connected between or within slices, so it can contain multiple non-connected components as long as they are the same color.
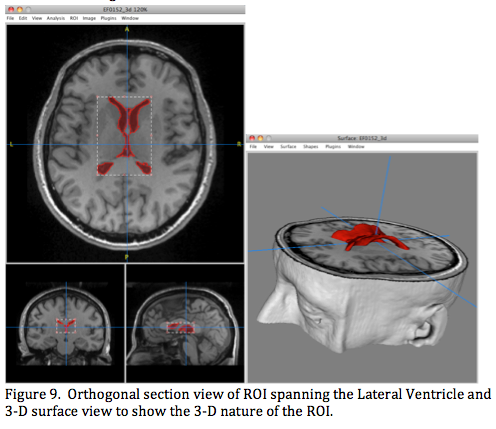 In the surface display of Figure 9 the 3-D ROI is converted to a surface format using small polygons (triangles) spanning the surface in a mesh-like manner. Mango provides two statistical measures for surface meshes, surface area and volume. Surface area is calculated by summing the areas of triangles. Volume is calculated using a method based on Gauss's Divergence Theorem (Eberle et al., 1991, Lancaster et al., 1992). Volumes calculated using surface meshes or from image voxels differ by only 1-2%, so either can be used. Surface area depends on spatial resolution and the nature of the surface, so it is best if all images used in a study of surface area have the same spatial resolution. Simple thresholding can lead to a surface other than that desired, and unintended volume and area stats. For example, the external surface of a brain is best isolated using the ROI/shrinkwrap thresholding option, which avoids internal brain surfaces. When thresholding is used to define an ROI boundary it is important to use a standard procedure and one that can be readily reproduced.
ROI - Controls
Delineating a region in an image for analysis is the main purpose of ROIs. Mango provides a wide range of ROI entering, editing, and analysis tools. ROI tool actions are for the current ROI color selected using the color icon in the Toolbox. If multiple color ROIs are present, selecting a different color brings that ROI to the front, and action is directed to the selected ROI. ROI manipulation (move, resize, delete, statistics, etc.) requires that it be selected. To select a single ROI using the mouse it must be in pointer mode. Pointing within and clicking selects the ROI. Also, in the pointer mode shift-dragging will open a dashed selection box that you can use to surround and select the ROI. Once selected an ROI is bounded by a control box that can be used for resizing (Figures 8 & 9). When the mouse pointer is positioned inside this box its icon changes to a small hand, and dragging will move the ROI.
ROI - Entering/Editing (2-D)
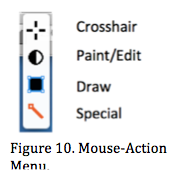 The icon-style mouse-action menu in the Toolbox has several categories for changing how the mouse is used (Figure 10). All mouse actions in this menu are for the current ROI color (determined by the ROI color icon in the Toolbox).
When selecting options within a window the mouse pointer is a standard small up-left arrow (standard system pointer). The mouse pointer changes to a small red open-center crosshair when inside a viewer (a targeting crosshair). This crosshair pointer is used to navigate through slices by clicking and dragging. When other mouse actions are selected, the pointer changes to a shape appropriate for their actions (Figure 10). These actions are for use only in the large view. To navigate to a different slice move the mouse pointer to one of the smaller windows or use the keyboard navigation keys.
A 'Quick Toggle' setting in preferences provides a means to switch between two mouse actions by pressing the keyboard 'f' key. We recommend setting the Crosshair pointer as one option (this is the default) to easily get back to the pointing mode from another mouse action mode.
Paint/Edit
In the Paint/Edit mode the mouse becomes a tool for creating and editing ROIs. This category opens a submenu where the user can select an elliptical or rectangular shaped tool with three actions: painting, erasing, and editing. Moving the mouse with the button down paints or erases. Painting adds voxels under the tool to the ROI, and erasing removes voxels under the tool from the ROI. The editing option will paint if the button is down when the tool is within an ROI (used to push border outward) and erase if the button is down when the tool is outside the ROI (used to push border inward). Tool size can be increased (+) or decreased (-) as needed. A specific range of image values for painting can be set, helpful to only paint voxel within a desired value range. These tools can be extended from 2-D to 3-D if necessary using the 'Set Tool Size/Set Tool Slice Range' option. The mouse-action icon is automatically set to that of the last tool selected (Figure 10).
Draw
The Draw mode provides a submenu with options for entering rectangular and elliptical ROIs or for tracing a ROI. Standard rectangular and elliptical shaped objects are drawn by clicking to set the starting position and dragging to set size. Tracing is used to manually outline a region. Clicking the mouse places a point, and moving then clicking sets a new point and connects the preceding point to the current point with a line. This is continued until the user clicks near the starting point to complete the ROI (closes the outline). Small errors made when outlining an ROI can be corrected using the edit mode. Tracing is quite helpful for manually defining 2-D outlines. The Draw mode also has options for point and line ROI entry. Points are entered for each click and clicking two endpoints draws a line.
Reminder: Painting, drawing, and editing mostly apply to the section image in the large view, so they are specifically 2-D ROI actions, but their actions can be extended to nearby slices using the slice range option as indicated under Paint/Edit. Note: When single-slice ROIs of the same color are entered on multiple slices the ROI becomes a 3-D ROI.
ROI - Special Tools
The Special mouse action menu has tools that automate entry and editing of ROIs. The icon for these tools is similar to the 'Magic Wand' used in Photoshop, so we also refer to these as Magic-Wand tools. These tools are for 3-D ROIs (or VOIs) that consist of one or more non- connected components. Some tools are specifically designed for independent editing of such components. The concept of voxel neighbors is important for processing components. In Mango a neighboring voxel is one that shares a face, called a direct neighbor, and a voxel in a 3-D image can have only six such neighbors. All voxels within a component ROI are neighbors, but none are neighbors of voxels in other components of the same ROI.
Seed Growing
With the Add Region in Value Range option the user clicks a location in the image to set a starting or 'seed' voxel for an ROI. A neighbor voxel will be added to the ROI if its value falls within the user-designated range. This process is repeated and the ROI enlarged until no new neighboring voxels are found within the designated range. This process is called seeded region growing. The range can be symmetric about the seed voxel's value or a min- max range including the seed voxel (less sensitive to where the seed is selected). This processing is semi-automatic since the user selects the seed point and sets up the range. This tool is useful for making a 3-D ROI for a small region of interest that is clearly distinguished from its surrounds but which has values similar to more distant (non connected) regions. One use of this option is to make ROIs for individual structures such as the lateral ventricles (Figure 9), the caudate, the putamen, or the thalamus in high-resolution MR images.
Isolate Component
With the Preserve Region option the user can isolate a single component of an ROI. Automated ROI methods sometimes leave many small, undesired non-connected components. These can be removed by clicking in the desired component 'preserving' it and removing all others.
Delete Component
The alternative Remove Region deletes a component of an ROI. Clicking within the undesired component removes it. This option is useful when you need to remove a small number of undesired components.
Dilate/Erode Component
The Dilate/Erode Region option will dilate (click) or erode (shift-click) a component of an ROI using a 3x3x3 tool (See ROI Morphological Operations below). These actions enlarge or shrink the component ROI.
Copy Component
The Copy Region will copy a selected component of an ROI that can be pasted using standard keyboard or edit menu options. To do this we recommend changing the ROI color before pasting to designate it as a different ROI.
ROI - Entering/Editing/Synthesizing (3-D)
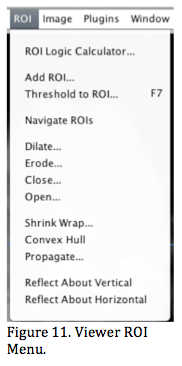 Additional processing options are available from the viewer's ROI Menu that extend Mango's automated entry, analysis, and editing ROI capabilities (Figure 11). These options are primarily for 3-D ROIs, and some actions such as 'Dilate' are meaningless for point or line ROIs. Actions that are not applicable for an ROI type are greyed out.
Add ROI
Add ROI inserts a cubic or spherical 3-D ROI of user-selected size centered at the large crosshair. This option is useful to place an ROI at a brain x-y-z coordinate in the world coordinate mode. An implied assumption is that the brain image where the coordinate is specified was spatially normalized to either the Talairach or the MNI brain space and that the origin was properly defined. Cubic and spherical ROIs can be used to dynamically probe and analyze different parts of an image when combined with ROI Stats.
Threshold to ROI
Threshold to ROI is an automated means to define a 3-D ROI using threshold settings. There are four thresholding options. The first (default) uses a single threshold and all voxels with values greater than or equal to the threshold value are included in the ROI. This option is suitable when the tissue of interest has the highest range of voxel values, such as bone in x-ray CT images. NOTE: No menu option is selected for this default operation.
Range to ROI
The second thresholding option is Range where the user selects minimum and maximum image values for the ROI. Range defaults to the minimum and maximum display settings, but can be manually edited to suite needs. This option is useful for images where ranges can be used to delineate different tissue types such as x-ray CT (fat, soft tissue, bone). This option is also useful to make an ROI for a range of negative values, for example negative z- scores in a statistical parametric image.
Shrink Wrap
The third thresholding option Shrink Wrap forms a closed 3-D ROI (no holes) about an object using a single threshold value. This option is used when simple or range thresholding leads to ROIs with unwanted holes. Shrink wrap is often used to make a whole brain ROI without holes caused by internal regions such as ventricles when using standard thresholding. The Shrink Wrap option first finds a single closed external ROI then inverts it to form an ROI containing only object voxels. The 'shrink wrap' procedure uses two criteria when forming the ROI, a threshold and connectivity. For 2-D options connectivity is enforced either 1) within axial sections, 2) within coronal sections, or 3) within sagittal sections; ignoring the direction orthogonal to the section. The 3-D connectivity option ensures within- and between-slice connectivity. The 2-D and 3-D options yield slightly different ROIs, but the 3-D approach is recommended unless you want to avoid connectivity between sections. The shrinkwrap ROI procedure can be used to define the exterior boundary of any object when a single threshold is appropriate.
Convex Hull
The fourth ROI thresholding option is Convex Hull. Like Shrink Wrap this operation uses a single threshold value but adds the constraint that the ROI be a convex hull. A convex hull is a surface that has no concave regions, in this case an ROI's surface. This algorithm initially uses a threshold to form an ROI then modifies the ROI by adding voxels to fill in concave regions. There are a number of algorithms for this but you can think of it as adding voxels to fill in concavities. The convex hull option can be used to make an ROI in high-resolution brain image that is geometrically similar to one from a low-resolution image (PET, SPECT, fMRI) both without sulcal regions. Some investigators have used the convex hull as a means to determine the level of gyrification, comparing a convex hull brain ROI with a shrink-wrapped brain ROI.
ROI Processing
Navigate ROIs
Navigate ROIs provides a means to quickly move the large crosshair to a specific ROI, particularly helpful when many are present in an image or the desired ROI is hard to locate. In Version 3.0 of Mango the Navigate ROIs feature replaced the Count ROIs feature. The number of point and line ROIs is indicated alongside their color icon. When a color icon is clicked the large crosshair is moved to the indicated ROI. For points and lines with multiple ROIs, repeatedly clicking the icon cycles through them. Slice ROIs are listed in the 'Regions' row. Note: For 2-D and 3-D ROIs there is only one ROI per color for a total of eight.
ROI Morphological Operations
Morphological operations are provided to assist in editing existing 3-D ROIs. These operations are based on 3-D structure elements, with size selectable by the user. For example, with size = 3 the structure element is a 3x3x3 region. The shape and range of a structure element can be determined by dilating a 1-voxel ROI.
Erode
The Erode operation reduces the boundary of an ROI. For this description we will assume that voxel values within the ROI = 1 and outside the ROI = 0. The structure element is moved throughout the image testing for boundary ROI voxels. The structure element is centered over voxel (x,y,z) for testing and the erosion action sets ROI(x,y,z) to the minimum value within the structure element's range. Away from a boundary where the structure element is either fully outside (all 0's) or inside the ROI (all 1's) no action is taken. Near a boundary, where there are both 0's and 1's within the structure element's range, ROI(x,y,z) is set to zero, removing boundary voxels. Erode ROI will remove an isolated component of an ROI if the structure element is larger than the component ROI. This action is useful to remove small components outside the main one that were inadvertently included when the ROI was made, such as those due to phase noise in MRI. The Preserve action in the Cursor Special menu can be used to remove components that were disconnected by eroding, preserving only the main component.
Dilate
 The Dilate operation extends the boundary of an ROI. The dilate operation is similar to the erode operation except it sets the value at the structure element's position to the maximum value within the structure elements range, i.e. the numeric value assigned to the ROI. This action adds voxels to the boundary of the ROI. ROI dilation is useful to fill in holes within an ROI that are smaller than the structure element. It can also used to bridge gaps and enlarge thin connections between different parts of the ROI.
Open/Close
Erosion and dilation can be used in pairs since they undo each other's operation. The undo is successful as long as a small region is not eliminated (erosion) or a small hole is not filled in (dilation). As such two other ROI morphological operators are provided: 1) Close that dilates then erodes and 2) Open that erodes then dilates. Analyst should practice using the morphological operations to gain more experience and determine when they will be useful in editing ROIs.
Shrinkwrap ROI
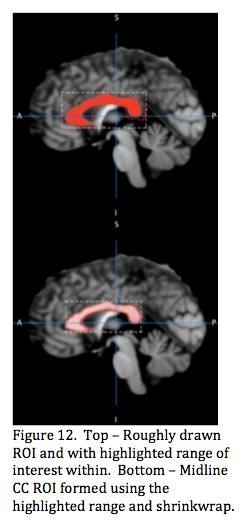
The Shrinkwrap... menu option uses a single-component ROI as the starting point for shrinkwrapping (Figure 12 top). The starting ROI is used to establish a working region surrounding the structure of interest, while excluding areas that might inadvertently be included based on the threshold value. As an example it can be used to form a 2-D ROI about the corpus callosum (CC) in the mid-sagittal slice. First, roughly trace an outline ROI about the CC in the mid-sagittal section image. Inspect the histogram from within this ROI to determine a threshold value, then shrinkwrap the ROI onto the CC (Figure 12). This option works with both 2-D and 3-D starting ROIs.
Propagate and Reflect
The Propagate... option extends a 2-D ROI (such as one formed using ROI painting) to adjacent slices, forming a contiguous 3-D ROI. Options are provided for the user to set the desired slice range. A common use of this option is to enter an ROI enclosing the data of interest to remove exterior image data, noise or otherwise. To do this the user first enters a rectangular ROI that extends across a section image. This ROI is then propagated to enclose the slice range of interest. Finally, the Image Calculator (below) is used to zero all voxel values outside of the ROI.
Reflect
The Reflect about Vertical and Horizontal option makes a copy of an ROI reflected about the vertical or horizontal position of the large crosshairs. This is useful to compare stats of an ROI formed in the one brain hemisphere with an identical ROI in the other hemisphere by reflecting it about the brain's midsagittal plane.
Single/All Slices Actions
You can toggle ROI actions between single slice and all slices using the slices button in the Toolbox. The icon for this button has three horizontal bars, representing slices. The default setting is the 'All Slices' mode where all three bars are bold. In the 'Single Slice' mode only the middle bar is bold. These modes are also referred to as ROI/VOI processing modes. The single-slice mode can be used to apply different ROI thresholds for different slices during entry. The single-slice option can also be used to erode or dilate a single slice of an existing 3-D ROI. Most ROI entering and editing is best done in the default all slices mode.
Important: Many ROI actions in the viewer's ROI menu can be undone using the 'Undo' option in the viewer's Edit Menu. An image buffer stores the prior result providing this undo capability. There is also an option to 'Redo' that will reverse the action of Undo. Only one level of undo/redo is supported, so make sure you are done before beginning other processing.