
Download Using_Mango.pdf
Image Transforms
This option is in the Viewer's Image Menu. When selected it opens a new dialog window with controls to apply a 4x4 affine transform to the current image (Figure 18). There are 12 transform parameters that can be adjusted (3- translate, 3- rotate, 3- scale, & 3- skew). These parameters can be adjusted independently and their effect on the current image is immediately seen in the viewer. The transform remains active when the transformed image is overlaid onto another image, and can be used to interactively align two images. This is particularly useful if landmarks to guide registration are not present (functional vs anatomical images) or if automated registration fails.
Load.../Save...
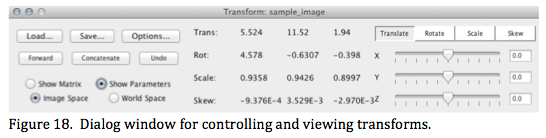 Transforms can be saved and loaded later to apply to the same image. The 4x4 affine transform matrix is displayed, but you can switch this to display the parameters of the transform (Figure 18). Note: The Toolbox transform icon with the curved arrow can be used to turn the transform on (arrow black) and off (arrow grey) to see the effect of the transform on the image. Transform parameters differ depending on world or image modes and the user can select which version to display.
Options
MNI to Talairach/Talairach to MNI
Several predefined transforms are available: 1) MNI to Talairach and 2) Talairach to MNI. These transforms assume that the image had been spatially normalized to fit the MNI brain space (option 1) or the Talairach brain space (option 2). These transforms manage differences in position (origins), orientation and size, but the origin may need to be adjusted to that of the AC if that is desired, since the origin in Talairach space differs a bit from that in MNI space.
Center of Rotation
Several options are provided to change the center of rotation used in applying and using transforms: 1) image origin, 2) image center (the default), or 3) current coordinate. Option 1 ensures that image origins remain aligned. Option 2 is appropriate when the image center was used as the center of rotation to formulate a transform. The keyboard 'c' moves crosshair to the image center. Option 3 provides a way to rotate about a particular anatomical landmark.
Forward/Inverse
This option switches from a forward (the default) to the inverse version of the transform matrix. This option is helpful when the loaded transform was designed adjust image A to match with image B and you need it to adjust image B to match image A.
Concatenate
This option is used to modify an existing transform using concatenation (multiplying existing 4x4 transform matrix by another 4x4 transform matrix to make a net transform). When the Concatenate button is clicked the user can enter additional translation, rotation, scale, and skew to the existing transform. The changes will be seen immediately in the displayed transform and transformed image. There is no limit on the number of concatenation stages, but more than two seem unreasonable.
Undo
Following concatenations the undo button reverses this action removing the last concatenation each time it is pressed. For example, if you added two additional concatenated transforms these can be removed by serially clicking undo. Undo can also be used to remove a single transform (clears all settings).