ROI Touch Tools
 These tools allow for the creation and editing of ROI masks, lines, and points. Touch editing is intended to be done in the larger main slice, leaving the smaller orthogonal slice planes for navigation and reference. The loupe tool can be used in conjunction with any of the below ROI tools to avoid obscuring the part of the image being edited.
 The favorites button, represented by a star, is located near the navigation buttons. Select your favorite tool mode, then tap and hold this button until a confirmation message is displayed. Once stored, tap this button to quickly toggle between Cursor and your favorite ROI tool.
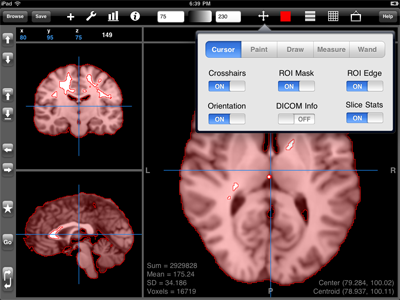
Cursor. ROI editing is turned off when this default option is selected. In this mode, touches affect slice navigation. Controls are provided to show/hide various view options.
Select to display orientation markers. These markers will appear white if the image header contains valid orientation information. They will appear yellow or red if some or all information is missing.
Select to display scan information information overlaid onto the image.
Select to display dynamic ROI slice statistics overlaid onto the image. In addition to these statistics, a colored point will be displayed at the center coordinate and a white point will appear at the centroid.
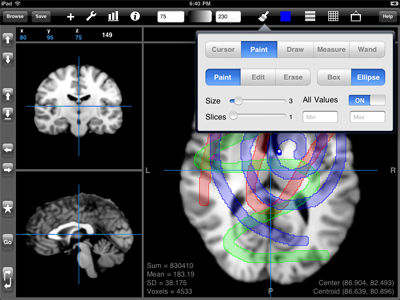
Paint. ROI masks can be created and edited using this tool. The paint mode creates a new mask area. Use erase mode to remove it. In edit mode, tapping within an ROI mask area and pushing out will paint new area. While tapping outside of an ROI mask and pushing in will remove area.
The paint tool shape can be either a box or ellipse. Use the size options to change how large an area the paint tool affects. Use the slices option to paint on slices above and below the current main slice.
By default, the paint tool is not sensitive to the image values. Turn off the option so that only voxels within a certain range are affected by the changes.
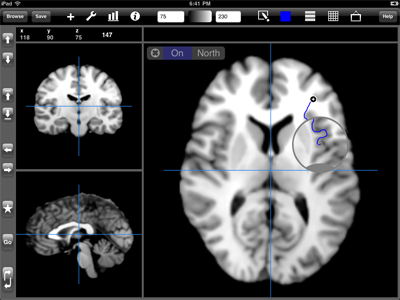
Draw. This mode contains tools for creating ROI masks, lines, and points. and can be used to create ROI masks of these common shapes. Use the option to create any shaped ROI mask (see Outline below).
To use to draw a polygon, first begin by tapping the image and creating a point. Tap again to create a second point. Continue tapping until the shape is complete and then tap the first point to close the shape.
To use to draw a continuous shape, tap and drag. Continue dragging and then release the tap near the starting point to close the shape.
To use to draw a continuous shape using the loupe tool (shown in example image), tap and hold until the loupe appears. Drag the loupe to the desired start location, then tap the On/Off button in the loupe menu to enable outline drawing. Grab and drag the loupe to draw. Drag near to the starting point to close the shape. To undo a the last drawn outline section, tap quickly and select . To remove an in-progress outline, tap quickly and select .
The option creates a two-point line, with no need to tap a complete button. Points can also be created and are placed anywhere the image is tapped.
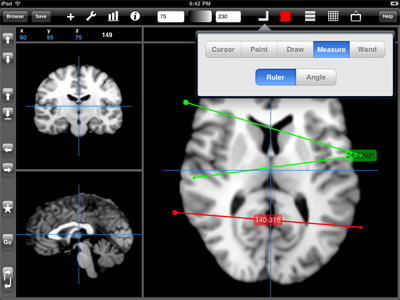
Measure. This mode creates special lines which display measurement labels.
When ruler is selected, the length of the line segments is displayed. When angle is selected, the angle between line segments is displayed.
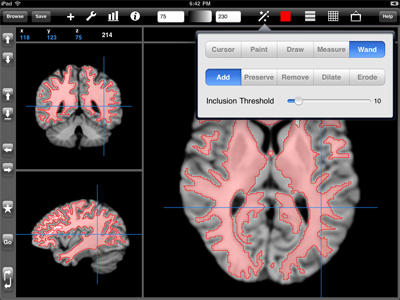
Wand. These magic wand tools allow an ROI to be edited based on component connectedness. The option can be used to create an ROI mask starting at the tapped location and including all contiguous voxels that fall within the inclusion threshold.
will remove all ROI components not connected to the tapped component. will remove the tapped component, leaving all else unchanged.
Use and to increase or decrease the size of a tapped ROI component.
